This post explains how to transmit data over French Orange LoRaWAN network using a SODAQ ExpLoRer board.
You need an active Orange Live Objects LPWA account.
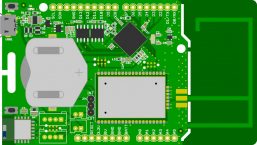
SODAQ ExpLoRer board
The ExpLoRer board is an Arduino compatible board, based on Microchip RN2483 LoRaWAN module. It includes an RN4871 Bluetooth module as well.
Reference documentation
- RN2483 documentation
- SODAQ ExpLoRer page on SODAQ website
- SODAQ support forum
- source code of the Sodaq_RN2483 library
- Arduino libraries
- source code of Arduino Core for SAMD21 CPU
- some C reference material
Getting started with ExpLoRer
As explained on the ExpLoRer page:
- download and install the Arduino IDE
- configure the IDE with the SODAQ additional boards URL (http://downloads.sodaq.net/package_sodaq_samd_index.json)
- install latest version of SODAQ boards
- select SODAQ ExpLoRer for the board type
- download Microchip Bluetooth library, and add it (Sketch / Include Library / Add .ZIP Library…)
Connect the SODAQ board to the computer using the appropriate USB cable. In the IDE, select associated communication port (Tools / Port)
Replace existing (almost empty) sketch by the one from the SODAQ page that makes the blue LED flash. Compile the sketch (Sketch / Verify/Compile) and then upload it to the board (Sketch / Upload).
The LED should start flashing.
Orange Live Objects
Configuration
Define the unique end-device identifier (devEUI – 8 bytes), the application identifier (appEUI – 8 bytes) and the application key (appKey – 16 bytes) you will use for your application.
Using your Live Objects credentials, connect to your account, and register the LoRaWAN kit, using above data:
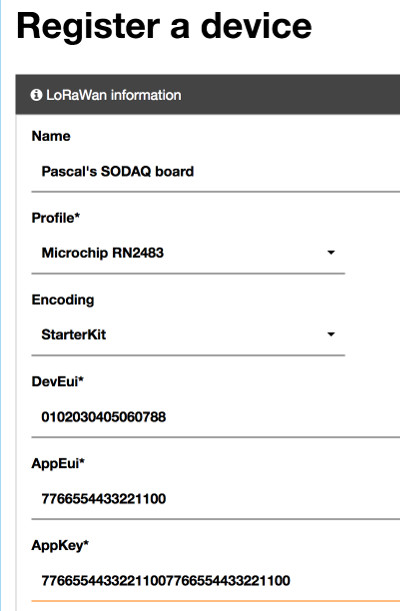
Try not to re-use the above values, as I’m already using them 🙂
First LoRaWAN test
SODAQ sample code
In the Arduino IDE, add the Sodaq_RN2483 library, using Sketch / Include Library / Manage Libraries… menu, and RN2483 as filtering string.
Sodaq provides a sample code that periodically reads a value from the board temperature sensor, and sends it over the LoRaWAN network. Modify it with above identifiers and key, set OTAA to true, and slightly modify setupLoRaOTAA() code so that it does not perform two successive initializations.
You get something like:
#include <Sodaq_RN2483.h>

#define debugSerial SerialUSB
#define loraSerial Serial2

bool OTAA = true;

// ABP
// USE YOUR OWN KEYS!
const uint8_t devAddr[4] =
{
    0x00, 0x00, 0x00, 0x00
};

// USE YOUR OWN KEYS!
const uint8_t appSKey[16] =
{
  0x00, 0x00, 0x00, 0x00, 0x00, 0x00, 0x00, 0x00, 0x00, 0x00, 0x00, 0x00, 0x00, 0x00, 0x00, 0x00
};

// USE YOUR OWN KEYS!
const uint8_t nwkSKey[16] =
{
  0x00, 0x00, 0x00, 0x00, 0x00, 0x00, 0x00, 0x00, 0x00, 0x00, 0x00, 0x00, 0x00, 0x00, 0x00, 0x00
};

// OTAA
const uint8_t DevEUI[8] =
{
 0x01, 0x02, 0x03, 0x04, 0x05, 0x06, 0x07, 0x88
};

const uint8_t AppEUI[8] =
{
  0x77, 0x66, 0x55, 0x44, 0x33, 0x22, 0x11, 0x00
};

const uint8_t AppKey[16] =
{
  0x77, 0x66, 0x55, 0x44, 0x33, 0x22, 0x11, 0x00, 0x77, 0x66, 0x55, 0x44, 0x33, 0x22, 0x11, 0x00
};

void setup()
{
  while ((!debugSerial) && (millis() < 10000)){
    // Wait 10 seconds for debugSerial to open
  }

  debugSerial.begin(57600);
  loraSerial.begin(LoRaBee.getDefaultBaudRate());

  setupLoRa();
}

void setupLoRa(){
  if(!OTAA){
    // ABP
    setupLoRaABP();
  } else {
    //OTAA
    setupLoRaOTAA();
  }
}

void setupLoRaABP(){
  if (LoRaBee.initABP(loraSerial, devAddr, appSKey, nwkSKey, false))
  {
    debugSerial.println("Communication to LoRaBEE successful.");
  }
  else
  {
    debugSerial.println("Communication to LoRaBEE failed!");
  }
}

void setupLoRaOTAA(){

  bool res = LoRaBee.initOTA(loraSerial, DevEUI, AppEUI, AppKey, false);
  debugSerial.println(res);

  if (res)
  {
    debugSerial.println("Network connection successful.");
  }
  else
  {
    debugSerial.println("Network connection failed!");
  }
}

void loop()
{
   String reading = getTemperature();

    switch (LoRaBee.send(1, (uint8_t*)reading.c_str(), reading.length()))
    {
    case NoError:
      debugSerial.println("Successful transmission.");
      break;
    case NoResponse:
      debugSerial.println("There was no response from the device.");
      break;
    case Timeout:
      debugSerial.println("Connection timed-out. Check your serial connection to the device! Sleeping for 20sec.");
      delay(20000);
      break;
    case PayloadSizeError:
      debugSerial.println("The size of the payload is greater than allowed. Transmission failed!");
      break;
    case InternalError:
      debugSerial.println("Oh No! This shouldn't happen. Something is really wrong! The program will reset the RN module.");
      setupLoRa();
      break;
    case Busy:
      debugSerial.println("The device is busy. Sleeping for 10 extra seconds.");
      delay(10000);
      break;
    case NetworkFatalError:
      debugSerial.println("There is a non-recoverable error with the network connection. The program will reset the RN module.");
      setupLoRa();
      break;
    case NotConnected:
      debugSerial.println("The device is not connected to the network. The program will reset the RN module.");
      setupLoRa();
      break;
    case NoAcknowledgment:
      debugSerial.println("There was no acknowledgment sent back!");
      break;
    default:
      break;
    }
    // Delay between readings
    // 60 000 = 1 minute
    delay(10000);
}

String getTemperature()
{
  //10mV per C, 0C is 500mV
  float mVolts = (float)analogRead(TEMP_SENSOR) * 3300.0 / 1023.0;
  float temp = (mVolts - 500.0) / 10.0;

  return String(temp);
}
Compile and load the sketch. Display the monitor window (Tools / Serial Monitor), and set its speed to 57600.
If you are under Orange LoRaWAN coverage, you should see following messages:
1
Network connection successful.
Successful transmission.
and sent data should be available from Live Objects website:
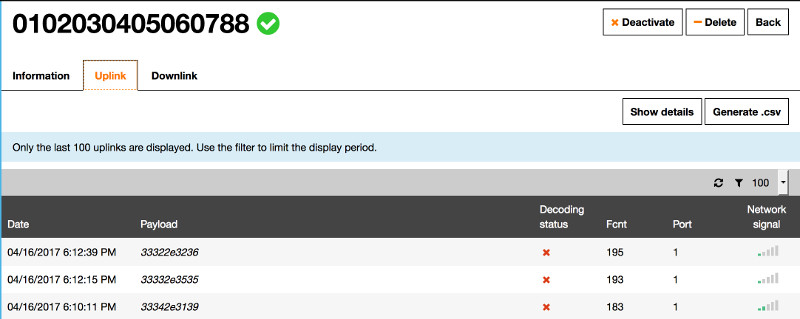
That’s it.